How Long Does a Kitchen Remodel Take in Dallas?
One of the first questions homeowners ask when considering a kitchen remodel project is: How long does a kitchen remodel take? The answer depends on several factors, including the scope of your project, the size of your kitchen, and whether any structural changes are involved.
Kitchen Renovation Timeline
Typically, a kitchen remodel takes anywhere between 6 and 12 weeks, but it really depends on the scope of work and design complexity. However, more extensive renovations that include custom cabinetry, new plumbing, structural changes, or intricate design elements may stretch the timeline to several months.
A successful kitchen renovation requires careful planning, proper scheduling, and quality materials. To help you set realistic expectations and to know what to expect when you remodel, let’s break down the kitchen remodel timeline into its key stages.
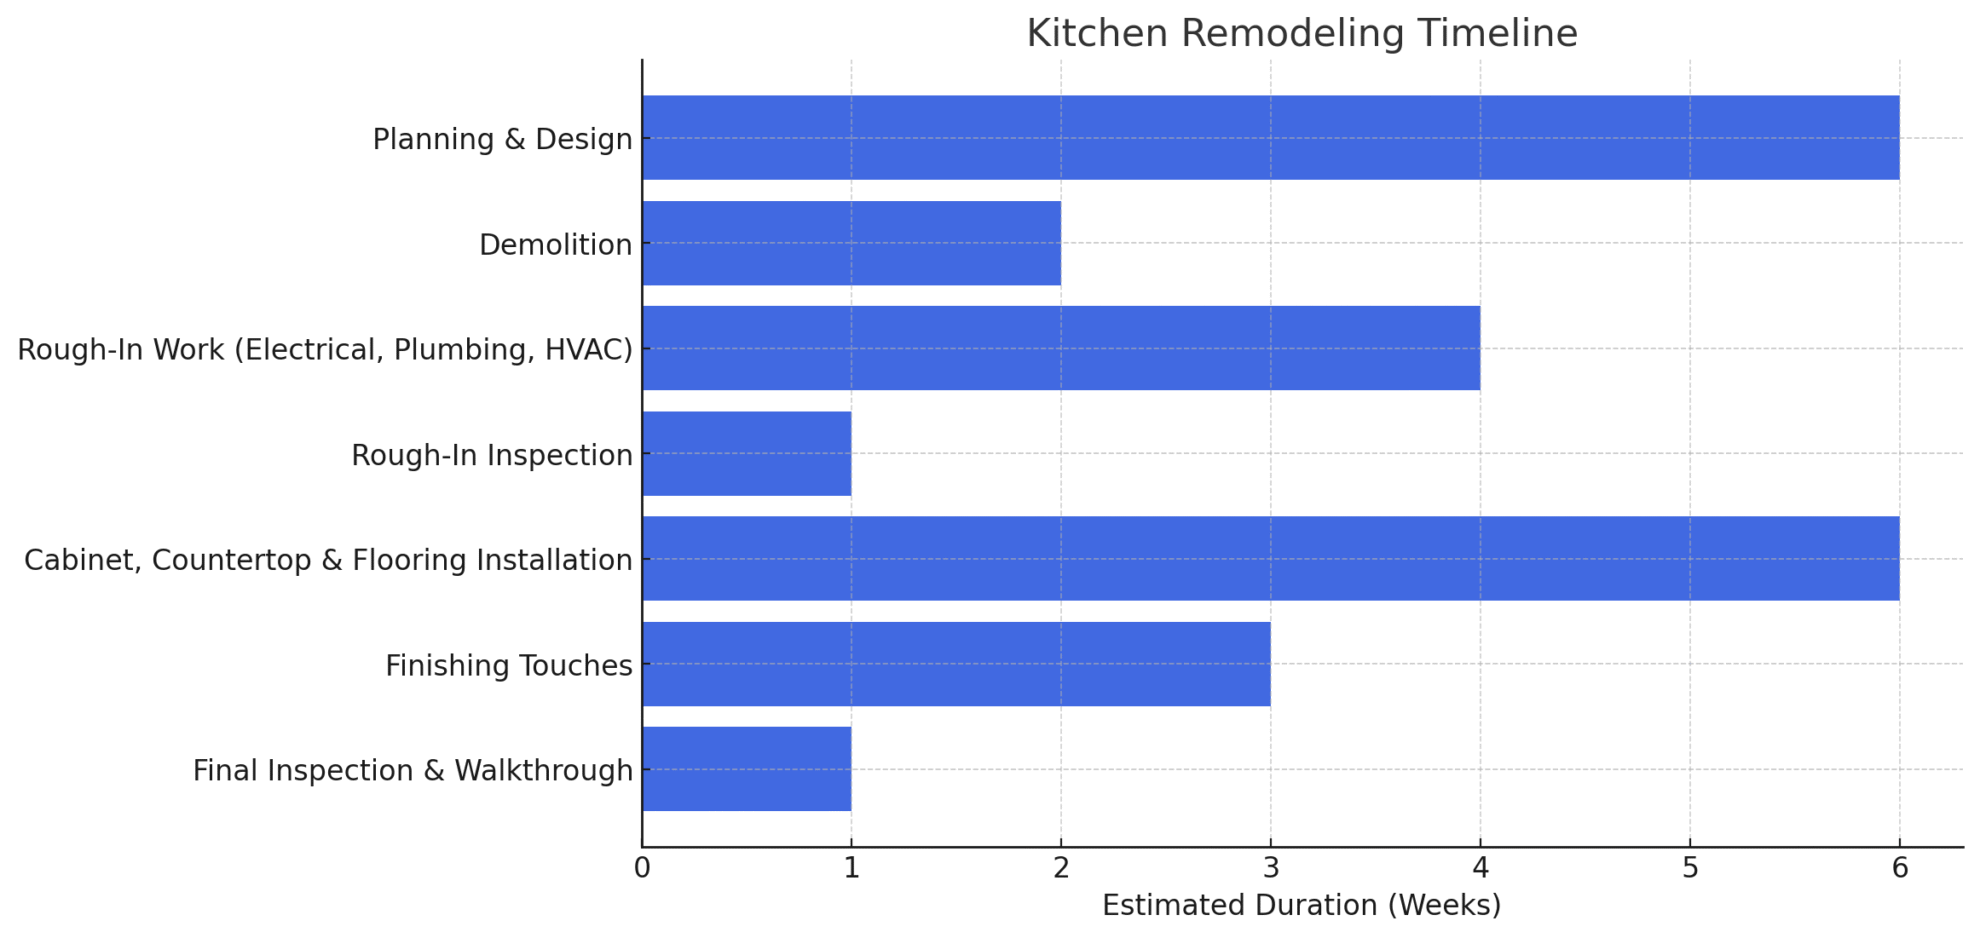
Stage 1: Planning & Design (4–8 Weeks or More)
What Happens in This Phase?
The planning phase is the foundation of your entire kitchen remodeling project. A well-thought-out plan ensures a smoother construction process, minimizes delays, and aligns your vision with the functionality of your new kitchen.
Key Tasks in This Phase:
- Determining the Scope of Work – Will your kitchen remodel project involve a simple refresh with new countertops and appliances, or will it require more extensive structural changes, such as removing walls to create an open-concept layout? Identifying the scope of your project early on helps set expectations.
- Hiring a Design-Build Team – Choosing a design-build firm with experience in kitchen renovation projects ensures that planning, design, and construction are seamlessly coordinated. A reputable contractor will guide you through the remodeling process and help you anticipate challenges before they arise.
- Finalizing Design Details – This includes selecting kitchen cabinets, flooring installation, plumbing fixtures, light fixtures, cabinet hardware, and color schemes. Every detail contributes to the final aesthetic and functionality of your new space.
- Ordering Materials—Due to supply chain constraints, some materials, such as custom kitchen cabinetry, natural stone countertops, and specialty tiles, may have long lead times.
- Securing Permits—Any major plumbing, electrical, or structural work will require permits from your local building department. Your design-build team will handle these approvals on your behalf to ensure compliance with local regulations.
Homeowner Considerations:
- Early Design Decisions Prevent Delays – Your design-build team will ask you to select cabinets, countertops, and flooring early. This is often earlier than clients expect, but it’s done to ensure availability. Delays in finalizing materials can push back the start date of construction.
- Material Availability Can Impact Your Timeline – Some materials, such as custom cabinetry and high-end kitchen appliances, may have long lead times. If delays occur, you may need to choose an alternative to keep the project on schedule.
- Prepare for Temporary Kitchen Arrangements—Since your existing kitchen will soon be out of commission, consider setting up a temporary kitchen in another part of your home. A designated space with essentials like a microwave, coffee maker, and small refrigerator can help you maintain daily routines during construction.
- Budgeting for Change Orders – While careful planning minimizes surprises, adjustments are sometimes necessary once demolition begins. Setting aside a contingency fund for unforeseen issues—such as outdated wiring or plumbing—can help avoid stress.
Stage 2: Demolition Phase (1–2 Weeks)
What Happens in This Phase?
With your new kitchen design finalized and materials ordered, it’s time to remove the old kitchen and prepare the space for transformation. The demolition phase is more than just tearing things out—it requires a strategic approach to ensure safety and efficiency.
Key Tasks in This Phase:
- Removing Existing Kitchen Elements – This includes tearing out kitchen cabinets, countertops, and flooring to clear the space for new installations.
- Taking Out Old Appliances & Fixtures – Outdated kitchen appliances, lighting, and plumbing fixtures are disconnected and removed.
- Structural Work—If your remodel includes structural changes, such as removing walls to create an open-concept layout, the work begins now.
- Material Disposal & Site Preparation – Proper disposal of debris is crucial, especially when working within local regulations. Salvageable materials may be repurposed or donated.
Homeowner Considerations:
- Older Homes May Present Hidden Challenges—Outdated electrical wiring or plumbing work may need upgrades. If we anticipate these issues, we’ll discuss them in advance and include them in the budget.
- Potential Lead Paint or Asbestos Risks – Homes built before the 1980s may contain hazardous materials that require professional removal, which could add time and cost to the project.
- Structural Changes May Require Engineering Approval—If we alter load-bearing walls, an engineer may need to inspect and approve the modifications before we proceed.
Stage 3: Rough-In Work (Electrical, Plumbing, HVAC) (2–4 Weeks)
What Happens in This Phase?
This is a critical phase where the behind-the-scenes systems that power your new kitchen are installed. Before any visible changes take shape, we must ensure that all electrical wiring, plumbing, and HVAC modifications are completed and up to code.
Key Tasks in This Phase:
- Electrical Work – Running new wiring for outlets, lighting, and appliances to accommodate the kitchen’s updated layout.
- Plumbing Work – Installing water lines and drainage for sinks, dishwashers, and refrigerators to support the new design.
- HVAC Modifications – Adjusting ductwork, installing vents, or improving air circulation for better efficiency and comfort.
Homeowner Considerations:
- Electrical Panel Upgrades May Be Required – If your home’s electrical system is outdated or at maximum capacity, an upgrade may be necessary to support new appliances and lighting.
- Inspections Are Required Before Moving Forward – Major plumbing and electrical changes must be approved before proceeding with drywall and cabinetry.
Stage 4: Rough-In Inspection (1 Week, Depending on Local Requirements)
What Happens in This Phase?
To ensure compliance with local building codes, all rough-in work must be inspected before proceeding with cabinetry and finishing touches.
Key Tasks in This Phase:
- Electrical Inspection – Ensures that all wiring, outlets, and circuits are properly installed and meet code requirements.
- Plumbing Inspection – Confirms that water lines, drainage, and gas connections are correctly installed and functioning as intended.
- Structural Inspection (If Applicable) – If we’ve made structural changes, such as removing walls or adjusting load-bearing elements, an inspector will verify that the modifications are secure.
Homeowner Considerations:
- Inspections Can Sometimes Cause Delays – Scheduling an inspector can take time, especially in areas with heavy permit backlogs. If an issue arises, necessary corrections must be made before moving forward, which may extend the kitchen remodel timeline.
- Approval Must Be Obtained Before Next Steps—Once everything passes inspection, we can install cabinets, countertops, and flooring.
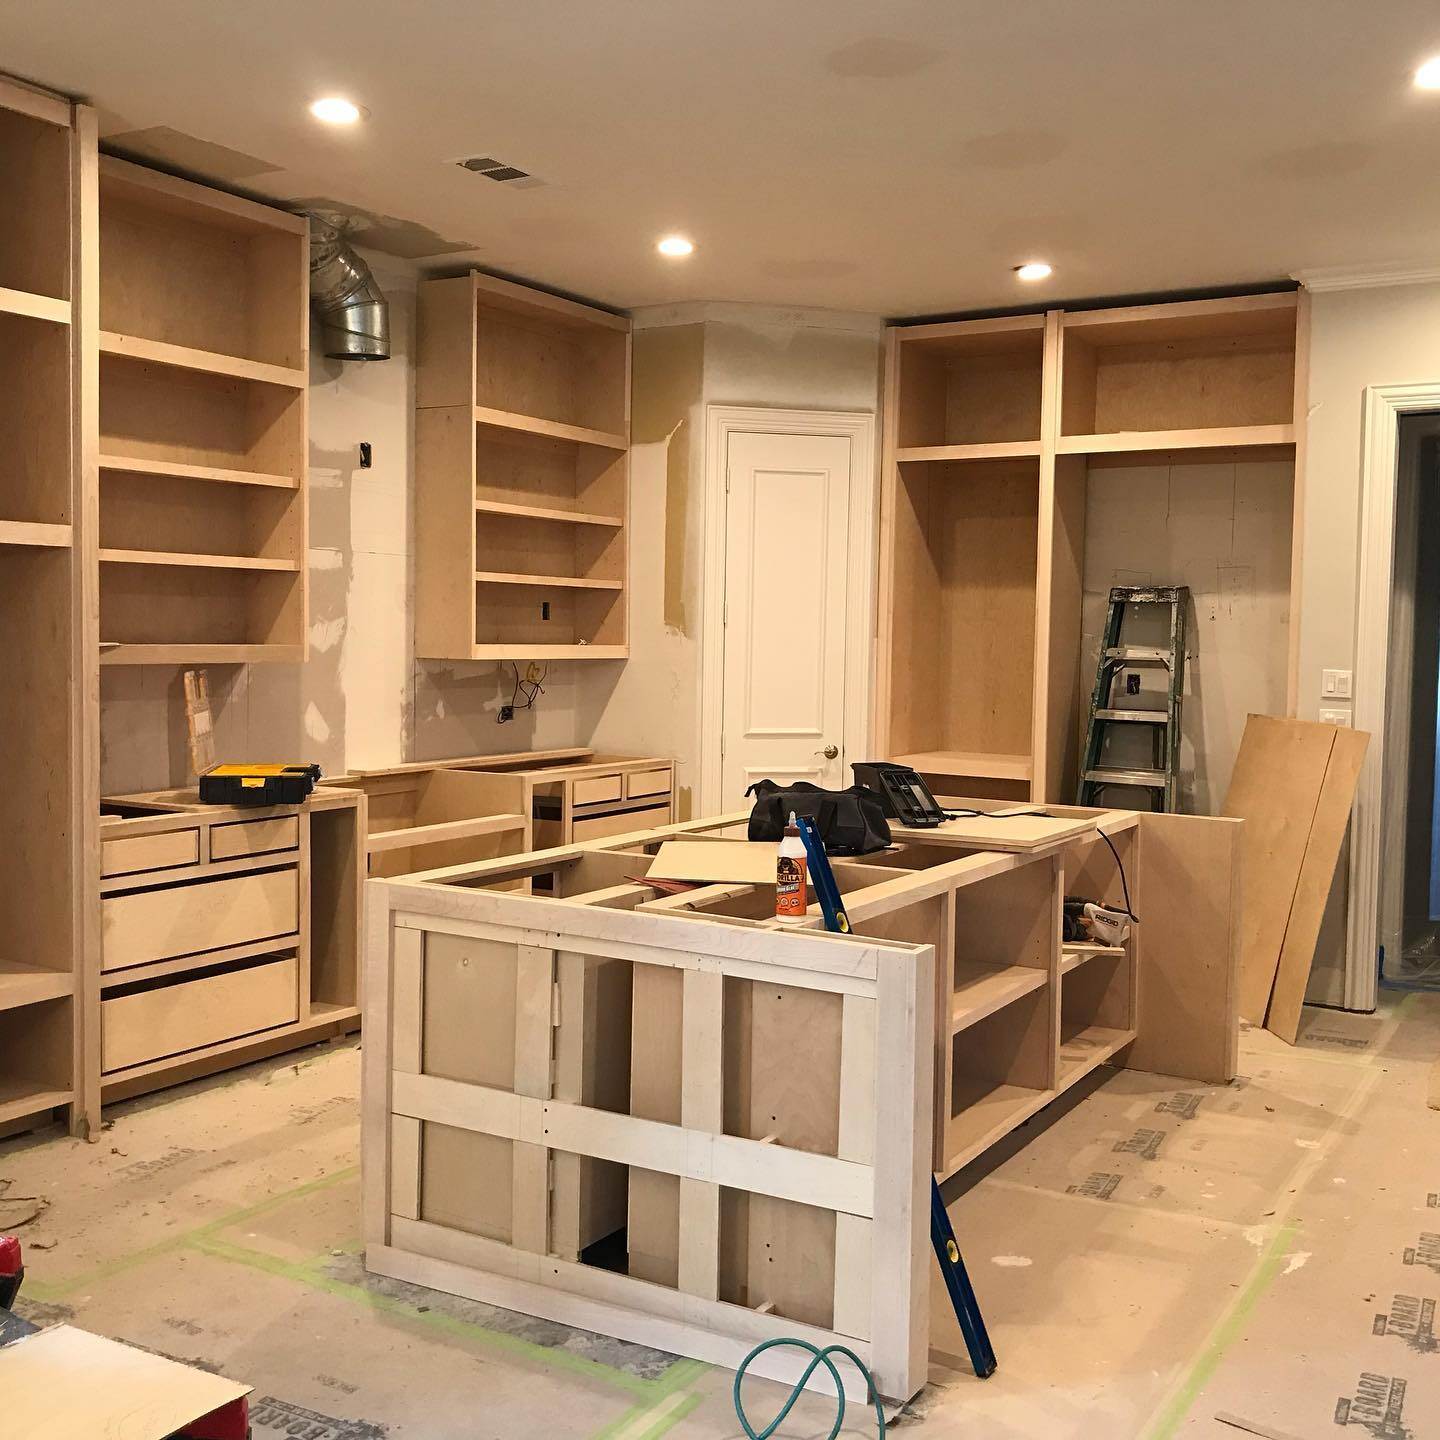
Stage 5: Cabinet, Countertop & Flooring Installation (3–6 Weeks)
What Happens in This Phase?
This is one of the most exciting phases of your kitchen remodeling project because your kitchen finally starts looking like a finished space rather than a construction site. While much of the previous work focused on behind-the-scenes elements like plumbing work and electrical wiring, this stage brings the design to life with new cabinets, countertops, and flooring.
Key Tasks in This Phase:
- Cabinet Installation – Whether you’ve chosen stock, semi-custom, or custom cabinetry, this step requires precision. Custom-built cabinets take longer to install since they are fitted to your exact kitchen dimensions, while stock cabinets can be installed more quickly.
- Countertop Templating & Fabrication—Once the kitchen cabinets are in place, a fabricator measures and cuts the new countertops to fit. If you’ve selected natural stone, such as quartz or granite, this process can take 1–3 weeks, as it involves cutting, edging, and polishing the material.
- Flooring Installation – Depending on your selection (hardwood flooring, tile, or luxury vinyl plank), flooring is either installed before or after cabinets. Some floors, like tile, are typically installed beforehand, while hardwood or luxury vinyl planks may go in afterward to prevent damage during cabinet installation.
Homeowner Considerations:
- Countertop Wait Time—The countertop fabrication begins after installing the cabinets. Since stone and quartz countertops must be custom-cut, expect a few weeks before they’re ready for installation.
- Flooring Sequence Matters – If you’re installing hardwood flooring, discuss with your remodeling company whether it should go in before or after the cabinets. Improper timing can lead to height mismatches or damage to the flooring.
- Appliance Fitment—New appliances, such as a slide-in range or under-mount sink, need to fit precisely during countertop installation. Make sure your measurements are correct to avoid adjustments later.
Stage 6: Finishing Touches (2–3 Weeks)
What Happens in This Phase?
In the finishing phase, all the details come together. At this stage, most of the heavy work is complete, and the focus shifts to aesthetics, precision, and final adjustments to ensure your kitchen is exactly as envisioned.
Key Tasks in This Phase:
- Backsplash Installation – Whether you’ve chosen subway tile, mosaic, or a custom stone slab, this final design element adds both beauty and protects your walls from splashes and spills.
- Light Fixtures & Cabinet Hardware – The right lighting enhances the entire space, from statement pendant lights over the island to task lighting under the cabinets. Hardware, such as pulls and knobs, provides the finishing touch to new cabinets, adding both style and practicality.
- Painting & Touch-Ups – Wall, trim, and ceiling touch-ups ensure the space looks polished. During this time, any dings or marks from installation are addressed.
- Bringing in New Appliances—Kitchen appliances such as ovens, refrigerators, and dishwashers are installed and tested to ensure proper function. This may also involve connecting gas lines or finalizing electrical work.
Homeowner Considerations:
- Timing Matters—Some finishing elements, like the backsplash, must be installed after the new countertops are installed, while light fixtures cannot be installed until the electrical work is complete.
- Minor Adjustments – Cabinet doors and drawers may need slight alignment, plumbing fixtures may require final tightening, and trim pieces or caulking may need finishing.
- Appliance Delivery & Installation—Delays in appliance availability can impact this phase. If custom panel-ready appliances are chosen, additional time might be required for installation.
Stage 7: Final Inspection & Walkthrough (1 Week)
What Happens in This Phase?
At this stage, your design-build team will perform a walkthrough with you to evaluate the finished space and identify any necessary corrections or adjustments. This is often referred to as a punch list, including minor fixes that must be addressed before final sign-off.
Key Tasks in This Phase:
- Punch List Review – Your contractor will go through the kitchen with you, noting any imperfections such as cabinet misalignments, scuffed paint, or minor gaps in trim work.
- Final Inspection – A building inspector may conduct a final inspection to ensure that all work complies with local building codes, particularly for electrical wiring, plumbing fixtures, and structural work.
- Testing Appliances & Fixtures – Your new appliances, lighting, and plumbing are tested to confirm they are functioning correctly. This includes checking for leaks under the sink, testing electrical outlets, and making sure drawers and doors open and close smoothly.
- Addressing Last-Minute Adjustments – If anything needs a final touch-up, such as a small paint correction or hardware realignment, these tasks are handled before the project is considered complete.
Homeowner Considerations:
- Be Thorough During the Walkthrough – Now is the time to make sure every detail meets your expectations. Check cabinet doors, test outlets, turn on light fixtures, and inspect all surfaces closely.
- Last-Minute Change Orders Can Delay Completion – If you decide to request changes beyond minor fixes, such as swapping out cabinet hardware or adjusting countertops, this could extend the kitchen remodel timeline and cost.
- Document Issues for Follow-Up – If there are any unresolved issues, work with your remodeling team to establish a timeline for completion. Some minor fixes may need a couple of days to schedule.
- Prepare for Move-In – Once the final inspection is approved and all punch list items are addressed, you can start moving back into your new space and enjoy your dream kitchen!
A kitchen renovation is a significant investment, and understanding the timeline helps set realistic expectations for your project. So, how long does a kitchen remodel take in Dallas? While the process typically spans 6 to 12 weeks, you’ve seen how factors like custom cabinetry, structural changes, and material availability can extend the timeline.
At Transom Remodeling, we guide homeowners through every stage of the remodel to ensure a seamless experience. Contact us today to start planning your dream kitchen with a team you can trust!

HOW MUCH DOES A HOME REMODEL COST IN DALLAS?
Planning a home remodel is an exciting journey, but understanding the potential cost is key to setting realistic expectations.
Whether you’re considering a kitchen remodel, bathroom renovation, home addition, or whole-home remodel, knowing the price range can help you budget with confidence.
- The expected costs of remodeling in North Dallas
- The difference between types of remodeling projects: mid-ranged and upscale remodels
- Plenty of beautiful Transom Remodeling projects to inspire you with your own remodeling projects!
Related Articles

Planning a Home Addition: What North Dallas Homeowners Need to Know
At Transom Remodeling, we talk to a lot of homeowners who love their home, but have outgrown it. Sometimes it’s a lack of functional living space, a growing family, or a desire to have a more modern home that is your primary motivation for considering a home addition. We also understand that many people feel…
Read More >>
Home Additions: Building Up vs. Building Out
Choosing between building up vs. building out can have a big impact on your home’s layout, budget, and long-term value, especially in space-conscious neighborhoods across North Dallas. Each approach has its pros and cons regarding property size, local regulations, and construction costs. What’s the Difference Between Building Up and Building Out? Both options can add…
Read More >>
Understanding Home Remodeling Costs in Dallas
Remodeling your home is a big decision, and when it comes to budgeting, it’s easy to get overwhelmed. From kitchen upgrades to whole-home renovations, remodeling costs in Dallas can vary…
Read More >>